
Burlap is an inexpensive material for crafting and decorating. It’s widely available, and you can buy it in rolls to use for various DIY projects, like garden decor and art, to enhance your outdoor space. We love burlap because it is eco-friendly, too.
A couple of burlap garden art pieces add instant rustic charm to a space. If you love crafting and you’d like to spruce up the garden with burlap garden art, we’ve got some projects that won’t take a weekend to complete.
Contents []
Transforming Your Outdoor Space with Burlap Fabric

It’s always a good feeling to decorate your garden with art pieces! Here are some great ideas on how to use burlap fabric to add instant rustic charm and enhance the look of your outdoor space.
Decorative Burlap Cushion Covers
Add warmth to your outdoor seating area with cushion covers made from burlap. It’s easier than you think! Follow these simple steps to craft your own:
Collect burlap fabric, measuring tape, scissors, sewing machine, thread, pins, and decorative elements like buttons or ribbons.
Using the measuring tape, determine the dimensions of your cushion and add extra for the seam allowance. Then, cut two identical pieces of burlap according to these measurements.
Place the two burlap pieces together, ensuring the rough sides are facing each other. Pin them along the edges to secure them in place. Thread your sewing machine and stitch along three sides of the pinned fabric, leaving one side open. This will form the enclosure for the cushion.
Trim any excess fabric from the edges to neaten the seams and reduce bulkiness. Carefully turn the cover inside out through the open side so the rough side is now facing outwards. Slide your cushion insert into the cover through the open side. Ensure it fits snugly. Then, using a needle and thread, neatly hand-stitch the open side closed to secure the cushion inside.
Get creative by adding decorative elements like buttons, ribbons, or fabric paint to embellish your cushion cover. Sew these embellishments securely in place. Once all embellishments are attached, give your cushion cover a final press with an iron to smooth out any wrinkles and flatten seams.
Place your finished decorative burlap cushion cover on your couch, chair, or bed to add a touch of rustic elegance to your outdoor seating area.
Table Runner
Warm up your table setting with a decorative table runner made from burlap!
Measure the length and width you want for your table runner using the measuring tape. Add a few extra inches to each measurement for seam allowance. Then, cut the burlap fabric to these dimensions.
To prevent fraying, fold over each edge of the burlap fabric by about half an inch and press with an iron. Then, stitch along the folded edges using a sewing machine or hand stitch with a needle and thread.
Go ahead and add decorative elements like lace or ribbon along the edges of the table runner. Simply pin the embellishments in place along the edges of the burlap fabric and sew them securely using a sewing machine or hand stitching.
Decide if you want any patterns or designs on your table runner. You can use stencils, fabric paint, or even appliqué to add personalized touches to your creation.
If you’ve chosen to add any decorative elements like stencils or appliqué, now is the time to attach them to your burlap fabric. Follow the instructions carefully for your chosen method of attachment. Once all embellishments are attached, give your table runner a final press with an iron to smooth out any wrinkles and ensure everything is securely in place.
Lay your finished decorative burlap table runner along the center of your dining table or buffet to add a touch of rustic charm to your dining area.
Jute Wall Decor

Burlap wall decor is a great way to add interest to blank walls or embellish doorways. This project requires a wooden dowel or branch, twine or ribbons, and a glue gun. You’ll also need embellishments, such as faux flowers or wooden letters.
Start by cutting the burlap into size. You can choose any shape you like, such as a rectangle, square, or even a heart. Fold over a small section of the top edge of the burlap to create a pocket for the wooden dowel or branch. Use hot glue to secure the fold in place, leaving enough space for the dowel to slide through.
Slide the wooden dowel or branch through the pocket you created at the top of the burlap. This will serve as the hanger for your wall decor. Cut a length of twine or ribbon and tie it to each end of the wooden dowel or branch to create a hanger for your wall decor. Make sure it’s securely tied and evenly spaced.
Get creative and add embellishments to your burlap wall decor. You can hot glue faux flowers, wooden letters, or any other decorations onto the burlap to personalize it to your taste. If you plan to hang the wall decor on a door, for example, you can use embellishments that spell out “Welcome Friends.”
Once your wall decor is complete, find the perfect spot to hang it in your home. Use a nail or adhesive hook to securely hang it on the wall.
Garden Gnome Dress
Dress up your garden gnomes with burlap. Choose medium-weight, soft polyester burlap fabric because this material is weatherproof; it won’t fade or fray easily despite the harsh elements.
Measure the height and width of your garden gnome. Add a few extra inches to each measurement for seam allowance. Then, cut a piece of burlap fabric to these dimensions.
Fold the burlap fabric in half vertically. Near the top edge, cut out a semi-circle for the neck hole, leaving enough space for the gnome’s head to fit through. Then, cut two smaller semi-circles on either side for the arm holes.
Stitch along the sides of the burlap fabric using a sewing machine or hand stitch with a needle and thread. This forms the sides of the dress. Fold over the raw edges of the neck and armholes and the bottom edge of the dress to create hems. Secure them in place with a sewing machine or hand stitching.
Get creative and add embellishments to the dress to give it personality. You can sew on buttons for decoration or use felt to create pockets or other details.
Once your Garden Gnome Dress is complete, carefully slip it over the body of your garden gnome, ensuring the head and arms fit through the appropriate holes. If the dress is too loose or tight, you can make adjustments by sewing the seams again or trimming excess fabric.
Place your dressed garden gnome in your garden or on a shelf where it can be admired by all who pass by.
Decorative Sunshade
Burlap makes the best material for sunshade because it is lightweight and permeable – it lets light pass through but cuts its intensity. A sunshade made from burlap can be installed in any seating area, letting you enjoy your garden in comfort.
To create a burlap sunshade, you’ll need burlap, wooden dowels or poles, rope or twine, scissors, grommets or eyelets, a hammer, and any decorative elements like paint or stencils.
Determine the size of your sunshade and cut a piece of burlap fabric to fit. You can choose any shape you like, such as a rectangle or triangle, depending on your preference and the area you want to cover.
TIP: To prevent fraying, fold over the edges of the burlap fabric and secure them in place with a sewing machine or by hand stitching.
Along the edges of the burlap fabric, evenly space out grommets or eyelets. Use a hammer to secure them in place according to the manufacturer’s instructions. These will be used to attach the sunshade to the wooden dowels or poles.
Slide wooden dowels or poles through the grommets or eyelets along the top and bottom edges of the burlap fabric. These will provide structure and support to the sunshade.
Tie rope or twine to the ends of the wooden dowels or poles to create handles for easy hanging and adjustment. You can personalize your sunshade by adding decorative elements like paint, stencils, or appliqué.
Find the perfect spot to hang your decorative sunshade outdoors. You can attach it to a pergola, gazebo, or between two posts using hooks or clips. Once your sunshade is securely in place, relax and enjoy the shade it provides on sunny days. It not only adds a decorative touch to your patio or sitting area, but also helps keep you cool and comfortable.
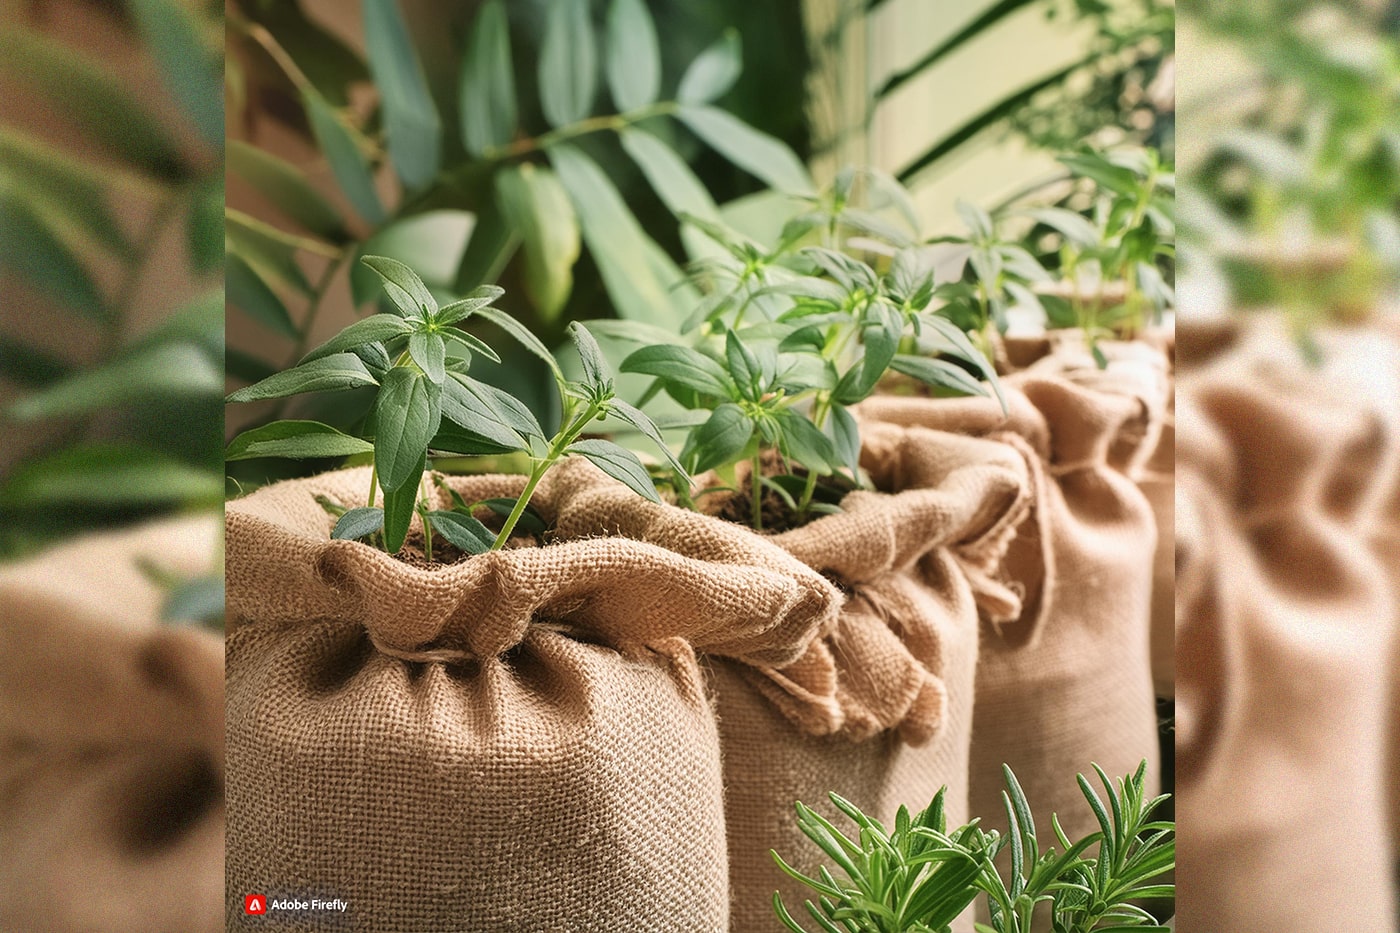
Flower Pot Cover

Creating a flower pot cover using burlap is an easy and charming way to add a rustic touch to your indoor or outdoor plants.
You’ll need burlap fabric, scissors, a measuring tape, needle and thread, and any embellishments like ribbons or buttons. Measure the height and circumference of your flower pot. Add a few extra inches to each measurement for seam allowance.
Using your measurements, cut a piece of burlap fabric to fit around your flower pot with some overlap. Fold the burlap fabric in half vertically, with the rough side facing out. Sew along the edge opposite the fold, leaving the top and bottom edges open. This creates a tube shape.
Then, fold over the top and bottom edges of the burlap tube and sew them securely to create neat hems.
Get creative and add embellishments to your flower pot cover. You can sew ribbons, buttons, or other decorations to personalize it to your taste. Slide the cover over your flower pot, adjusting it so it fits snugly. The seams should be at the back of the pot.
If the cover is loose, you can secure it in place with adhesive strips or pins. Place your decorated flower pot cover wherever you like, whether it’s indoors on a windowsill or outdoors on a patio table. It adds a charming touch to any space and can be easily removed if you need to water your plant.
… And there you have it, fun and easy projects you can DIY on a weekend using burlap! Remember, you can adjust the size and shape of the material then add your own embellishments to make them a unique piece of art for your garden.


